Some people are also natural tool builders instead of game builders. For
them, the game is the reason for building game engines and tools, not
the other way around, and their ultimate dream is to build engines and
tools that are so efficient, so optimized, and so friendly that the
game practically builds itself.
—Derek Yu, Spelunky
I have a tendency to drift towards coding in virtually any situation, even
ones that aren’t initially technological in nature. One problem with this
approach, as Derek Yu continues to write in Spelunky, is this:
To them, the engine itself is a work of art, too, and I’m inclined to
agree. In practice, though, it’s easy for someone like this to noodle
on their game engine ad infinitum.
This is precisely my problem, and it’s part of why despite being very excited
about game development as a kid, I never finished any of the games I started
making. I never really let myself have fun with game design because I was
so preoccupied with building engines and tooling.
One of the things that attracted me to building a Quake level, though, was
that–if I set the right constraints for myself–it would force me to focus
on design. As I described in my previous blog post, the tools already
existed and were easy and fun to use. I just needed to take the time to
actually design something.
Inspiration
The first thing I wanted to do was re-acquaint myself with Quake’s
particular design vocabulary. I hadn’t played the game in 20 years,
so I started off by playing id’s original levels.
One interesting design pattern I noticed was that whenever I
encountered a giant, lightning-throwing monster called a Shambler,
there was frequently a Quad Damage power-up somewhere nearby that
made the Shambler easy for me to defeat (in fact, I was originally so
rusty at the game that I couldn’t kill it without the Quad Damage).
I liked this strategic element, and it ended up being a pattern I’d
reuse in my first level.
Theory
I also watched some videos and read blog posts to learn more about
the theory behind level design. Of particular help was Aubrey Serr’s 2019
GDC talk Designing Radically Non-Linear Single Player Levels, which
described a layout technique for encouraging player agency (Robert Yang
has called it valence theory).
Andrew Yoder’s blog post The Door Problem of Combat Design was
also very helpful, though in retrospect I’m afraid parts of my final map
still fell prey to some of the pitfalls described in his post. Level design
is hard!
Planning
At the beginning, I just wanted to focus on my level’s high-level
gameplay, without having to worry about its aesthetics–I believe this
is sometimes called “greyboxing” or “blocking out” a level.
Aleksander Marhall’s prototype WAD was very helpful
for this, as it provided textures that clearly communicated that the
level was in its early design stages without distracting the player.
A blank canvas
At first, I was hesitant to do anything. I’d played a bunch of Quake
levels, but how was I supposed to create my own layout from scratch?
The resource that helped me get over my “blank canvas syndrome” and
actually start designing something was Quake Builder’s
Quake Mapping Tips: Building Layouts video. It describes
a process of starting with an extremely simple level–one where the goal
is right in front of the player, and they literally just have to walk over
to it in order to win the level–and then gradually “abstracting” the
goal away from the player via obstacles. So I started with this approach,
originally making a long room with the player at one end and an exit
at the other, and slowly introduced walls, monsters, locked doors, and
other obstacles.
Playtesting
Eventually, I had a very basic level that I could share with others.
dumptruck_ds, the creator of the TrenchBroom tutorials I’d mentioned
in my last post, had encouraged his viewers to join his
Quake Mapping Discord, so I joined its playtesting channel
and asked for feedback in late September.
I was skeptical about whether I’d get any playtesters, but I did, and
rather quickly. A few minutes after I made my post, a mapper named
Alekswithak posted a “DEM file” in response: this was a relatively small
file containing a recording of his play-through, which I could play back
in Quake. He even annotated his DEM file with specific feedback about
my design, which appeared when I played it back.
Alekswithak’s main criticism was that my prototype felt a bit too cramped,
and that I ought to scale it up a bit. I also had a few friends try out my
level, and their feedback was helpful too.
For example, like me, my friend Kris hadn’t played Quake in a very long time,
and didn’t remember that there was a “completed” screen that displayed when one
wins a Quake level. And because the final room of my level, gated behind a locked
door, was never visible from the rest of my level, she didn’t realize that it
even existed–so she thought she had won my level, when in fact she had only seen
half of it!
So, I did what I noticed a lot of good Quake maps did, and made windows in the
level that gave the player a view into the final room, letting them know that
there was more they hadn’t seen yet.
Secrets
The final element I added was a secret, which I noticed that the original
Quake levels were quite clever at: there was always something a little
“off” about the part of a level that contained a secret, such as unusual
lighting, texturing, or level geometry. Shooting the unusual element, or
figuring out how to navigate to it (e.g. via a series of clever jumps),
would eventually provide the player with a special power-up, along with
a dopamine-inducing sound effect letting the player know that they’d
discovered something special.
Finding secrets was interesting detective work, and it was also a nice
repreive from the frenzy of gore that usually characterizes a Quake level,
so I wanted to make sure my level had at least one.
I’m still not sure if my level’s secret is too hard to find, though. To my
knowledge, no one has actually found it yet, so I might have made it a
bit too secret.
De-prototyping
By the time I had iterated on the level design a few times, I had grown so
fond of the prototype WAD’s aesthetics that I was conflicted about whether to
replace it with an “authentic” Quake look-and-feel.
Eventually I decided to abandon the prototype aesthetic, if only because
dumptruck_ds’s tutorials encouraged me to, and I’m glad I did. Aside from
helping me hone my lighting and texturing skills, it also pushed me to learn
some of TrenchBroom’s more advanced geometry features, as I ended up replacing
many bland boxes with more interesting shapes.
Finding a theme
The first thing I had to settle on, though, was a theme. dumptruck_ds had
recommended that novice map-makers find a map in the original Quake levels
that they liked, and stick to only using the textures from it. This seemed
like a wise self-imposed constraint.
My favorite theme from id’s original levels was exemplified by
Episode 3 Mission 4 (E3M4), “Satan’s Dark Delight”: it was a combination of
what appeared to be grey stone, copper, and halogen lamps. I later learned it
is sometimes referred to as the “runic” or “metal” theme.
During this phase, I kept a copy of E3M4 open in a second instance of
TrenchBroom, as it allowed me to easily consult my source material for
reference.
The makeover
A particularly useful resource was an article from the early 2000s by
Xenon called How to Make Rooms Look Good. This post walked the
reader through turning a bland, boring-looking box of a room into one that
looked like something out of a professionally-made game–like a home
makeover show for Quake levels. In particular, Xenon’s advice on how to start
the process was invaluable:
The main thing that comes to mind in this [room] is the lack of detail.
Whilst any usual novice mapper would go about attempting to add the said
‘detail’ early on at this stage, the right thing to do is go about defining
the room’s overall ‘shape’ first, before adding small-scale detail.
This phase of design felt like it was using a different part of
my brain, and it was quite satisfying to chisel the level into something
that felt more solid and architecturally interesting.
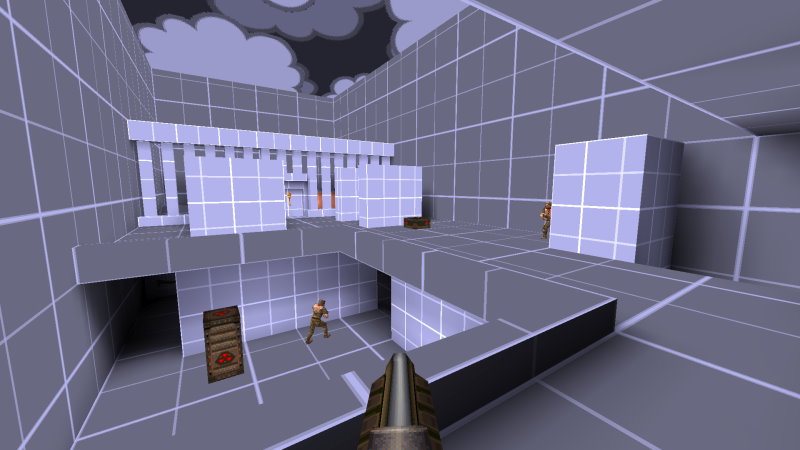 My level before the makeover.
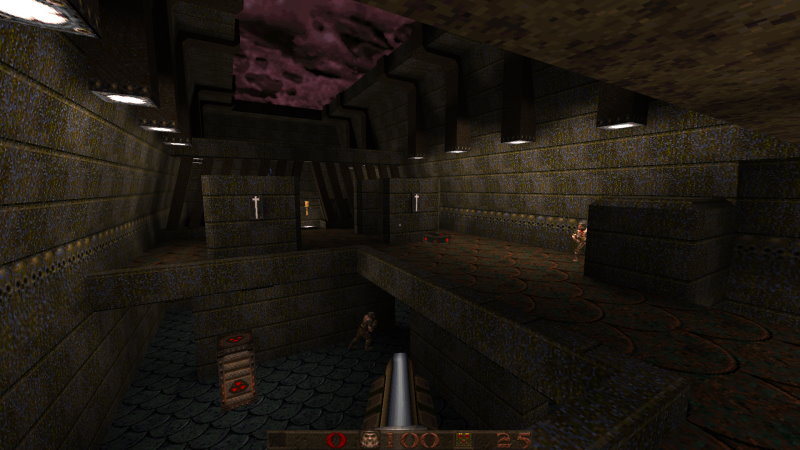 My level after the makeover.
The final product
In early October, I posted the latest version of my level to the Quake Mapping
Discord, and received positive feedback. Below is a recording of the DEM
file posted by mapper Greenwood.
Overall, I had a wonderful first experience in level design. I’m grateful
to the Quake Mapping community for iterating on the foundation that id
software built, creating amazing tutorials, answering all my novice questions,
and providing great feedback for my designs.
Playing it yourself
If you’d like to play the level yourself, you will first need to purchase
Quake from Steam or GOG if you don’t already own it.
Once you’ve installed it, you will want to figure out where it’s installed
on your system–both Steam and GOG’s apps provide contextual menus to do
this–and create a directory called maps in either its id1
or rerelease/id1 subdirectory (depending on whether you’re playing the
original Quake or its 2021 re-release). Inside that, you will want to unzip
my level’s ZIP file.
Then, start Quake, press ~ (it’s the key above your Tab key), and type
map my_second_map to play the level.
If you’d like to go further and explore all the great new content the community
has made for Quake over the past 25 years, check out Robert Yang’s
Quake Renaissance: how to start playing original Quake today.